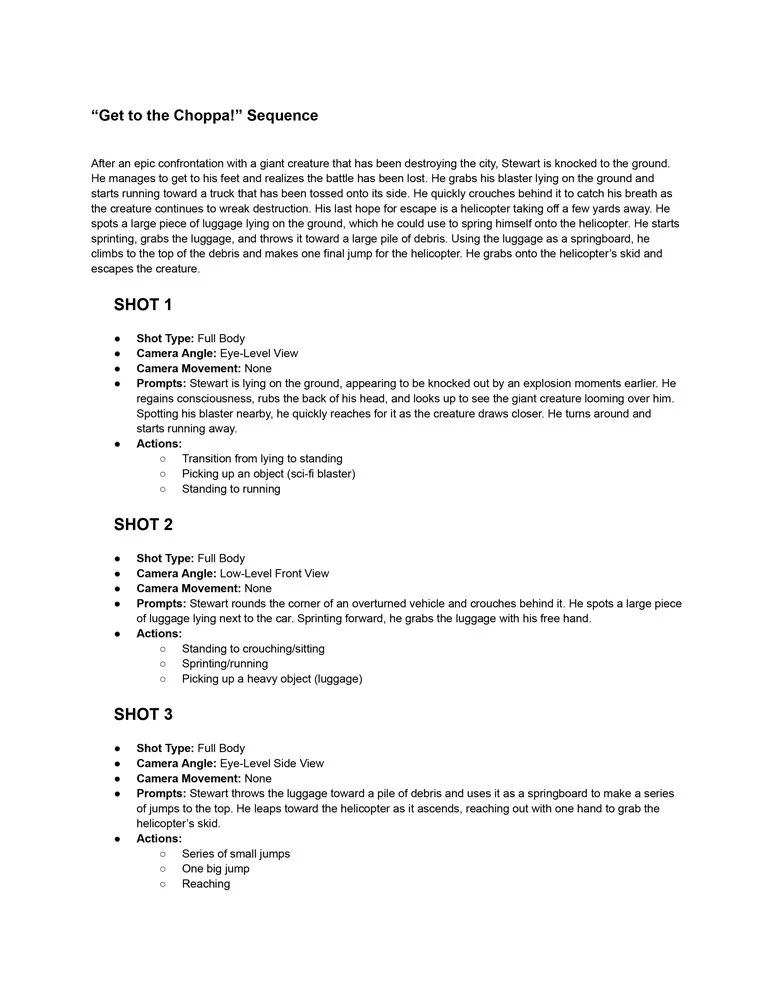
Advanced Body Mechanics - Shot 3

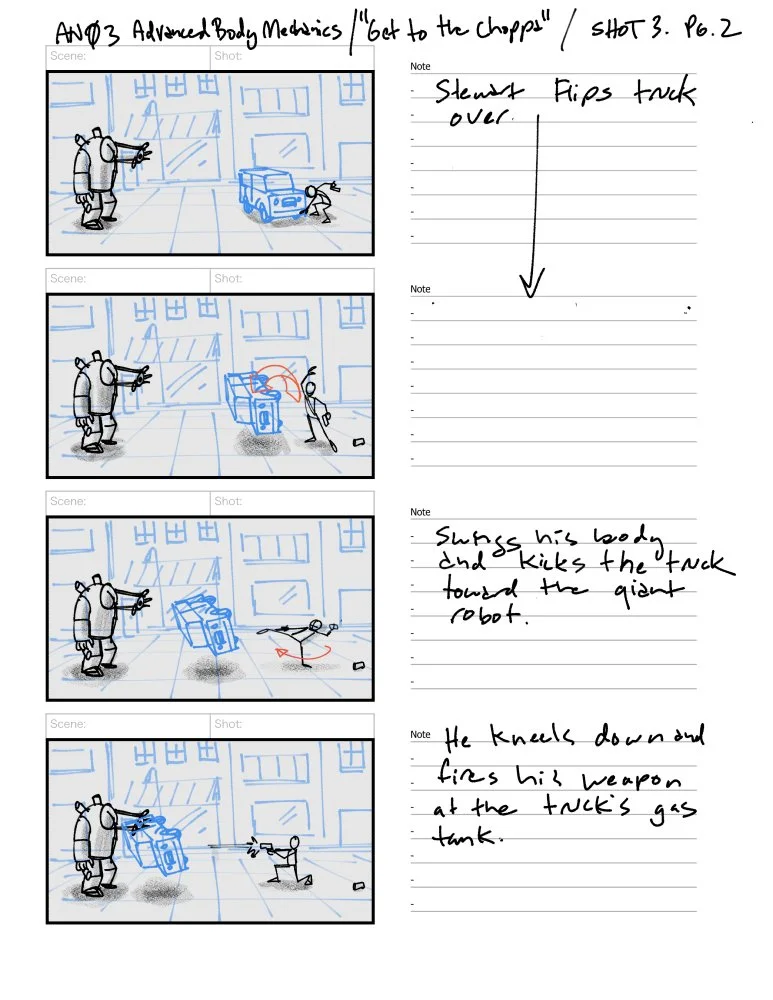
In the third and final shot of Advanced Body Mechanics, I wanted the hero to fight back against the villain. My idea was for the character to retrieve a serum or potion from the suitcase that had fallen out of the jeep in the previous shot. Initially, I planned for the hero to use special gloves that granted superpowers, but I opted for a simpler approach that didn’t require additional modeling. The hero then flips the jeep over and executes a jumping back kick, sending it flying toward the villain. Finally, the jeep explodes when the hero shoots the gas tank.


Blocking - The blocking pass for this shot was more challenging than the first two. I decided to animate the arms and legs in IK for the entire shot, which made posing trickier—especially during the spin for the jump kick. Normally, I would animate arms in FK and switch legs to FK when they’re off the ground, as I did in shot 2. However, my mentor mentioned that he prefers animating arms and legs in IK most of the time. I found that approach interesting and wanted to experiment with it myself. It ended up being more challenging than I expected, but in hindsight, that makes sense—my mentor has much more experience with it than I do.


Splining - In this pass, I focused on adding more weight to the truck when Stewart lifts it by adjusting the timing and refining the arm poses. A significant amount of time in this stage was spent fine-tuning the timing, spacing, and posing to ensure the right balance of weight and speed. This was especially important for making the kick feel powerful enough.


Polished - Here, I continued refining the curves and adjusting the spacing of body parts. I realized that some poses, particularly with the torso during the bottle throw and car lift, were a bit too extreme. I’ll need to dial those back for a more natural feel.


Polish Plus - In the final pass, I focused on polishing the animation, refining spacing, and toning down some of the more extreme poses. I also adjusted the jeep animation to enhance its sense of weight. Overall, I’m very pleased with how the shot turned out—though, to be honest, it felt a bit shaky in the early stages. Animating the arms in IK took some time to get used to, but it helped me achieve clean arcs and make subtle adjustments more easily. I’m not sure if I’ll stick with this workflow long-term, but it’s valuable to understand its strengths. I can see it being especially useful in certain situations.

Advanced Body Mechanics - Shot 2

In the next shot, I wanted to highlight the hero’s challenge and build tension leading up to the final shot. I decided on a long shot, with the villain in the distance gradually closing in. During this moment, he’ll be firing his weapon at the hero, adding intensity to the scene. This shot will also be more complex, requiring additional animation for elements like the missile and the suitcase flying out of the car.


Blocking - Overall, the timing feels solid. The main focus now is refining the posing and enhancing appeal. I need to ensure the line of action is clear and avoid over-animating.


Splining - At this stage, I focused heavily on the jump off and landing to enhance the illusion of weight. The poses started to feel stronger, but I also experimented with animating the arms in IK while he’s over the hood. Constantly readjusting the arms—and even the legs—every time I tweaked the torso was frustrating. In the next pass, I’ll work on refining the timing, making the movement snappier, and adjusting the floaty arm.


Polishing - In this pass, I added smear frames to the arms in the run cycle using lattice deformers to reduce flickering caused by the arm spacing. I also incorporated squash and stretch on the jump up—something I hadn’t really used in my Stewart animations until now. Additionally, I removed a few frames from the landing and the reach for the suitcase to make the movement feel snappier, which added more weight to the character.

Advanced Body Mechanics - Shot 1

Okay here we go, Advanced Body Mechanics! My mentor for this course is Jeremey Lazares who has over 20 years of experience of animating. He currently works at Pixar as a senior animator. This course is structured a little different than the previous two courses that I have taken. In this course, we will be animating only 3 shots which can also be strung together as a sequence. We were given a few themes to choose from, but I decided to use my own which was based on an action/scifi movie theme. Each shot has to use at least 3 actions which were basically walking, running, jumping, climbing, or push/pull/throw an object.

Blocking - Based on the feedback I got, I needed to make the first action of getting up to be more dynamic. So I found some footage of someone doing a “Kip Up” move, which you see a lot in martial arts films. I also reshot some of my reference so that my starting pose blended better into the new move. From there, I just tried to nail some of the key poses from the reference video into my blocking pass. I realized that I aslo needed to extend my run a little bit since you can see me start slowing down in the reference. The character is suppose to continue running into the next shot.


Blocking Plus - Some things I worked on this pass were the poses on the “kip up” and in the run cycle. The run cycle needed some more work in timing and spacing as well to make it feel faster.


Spline/Polish - Overall, I’m happy with how this stage turned out. I really tried to focus on timing, spacing and the arcs. It still need some more polishing, however, with the transition from the hop to the run. It needs a smoother transition and progression into the sprint. On to Shot 2!

Body Mechanics - Exercise 4 Physicality with Weight

The final assignment in Body Mechanics was to animate pulling or pushing an object with weight. We had the choice of deciding what that heavy object would be so I decided to use a sword. As a big fan of the Sword in the Stone and the great animator, Milt Kahl, I knew that this exercise would really challenge me on every level.

Sketch planning

In the first pass, I grab the key poses from the video reference. A sense of weight in the sword is still kind of missing though in the playback so I had to address that in the next pass.

In the second pass, the arc and spacing of the sword needs some more polish

In the second spline pass, the weight in the sword is finally feeling better. The head thrust in the beginning, though, is feeling like he is slamming his face into a wall.

In the final spline pass, I tried to tone down the head motion in the beginning and give more of an arc motion.

The final animation. Overall, I’m happy with how it came it out, but are still some things that I would like to tweak. For example, the hands reaction to the pull up on the sword got lost at some point. I would love to add that back in.

Body Mechanics - Exercise 3 Physicality with Locomotion

This assignment combined locomotion (walking) with a physical action—getting up from a seated position or sitting down. I was attending a conference during this assignment, so my video reference wasn’t shot very well in my hotel room. This is another example of how I wish I had spent more time capturing better reference footage, such as finding a more open space to shoot in and using my wife as the subject, since I was using the Stella rig. These kinds of improvements could have helped enhance the animation. In my planning thumbnails, I began marking where I observed translations and rotations of body parts, as well as where certain principles of animation, like anticipation, would come into play

As you can see in the first pass, the “personality” of the character isn’t quite right. Obviously, this required some adjustments be made.

So I decreased the spacing between the feet and swing the hands out a little more to portray a more feminine walk.

I add more drag in the head and weight in the body as it transitions from sitting to standing.

I continue to focus on the weight, timing and spacing. I also decide to hide the ponytails because I didn’t have enough time to animate them well enough to show.

The final animation.

Cartooning with Mike Kunkel Week 10 - 11

The final exercise for Mike Kunkel’s Cartooning class was to design a 'Cartoony Logo Mascot.' We were given five options to choose from, and I picked the energy drink company Supa Soda. As someone who has fond memories of watching Banana Man as a kid, this was really fun to work on. I initially started with some sketches of a superhero-like character shaped as a can. Then I moved toward a Rocketeer/stuntman-type character, similar to Evel Knievel, with can-shaped rockets on his back or hands

I settled on my initial idea—a can-shaped character. I wanted it to be cute and fun, like a children’s cereal mascot, but also full of energy.

The final black & white version.

Body Mechanics - Exercise 2 Full Body Walk

This exercise was pretty straightforward, especially since I had just completed a lower-body vanilla walk cycle in the previous class, Animation Basics. I’ve also done plenty of walk cycles as a 2D animator, which feels like a long time ago now.

For this walk cycle, I wanted to challenge myself as an animator by using the female rig, Stella. I don’t have much experience animating female characters (the last time being my thesis video), so I knew this would be a great opportunity to test myself. I started with a reference video, but looking back, I probably should have filmed my wife walking to get a better reference.

As I progress through this program at Animation Mentor, I’m really starting to appreciate just how important it is to have good reference video. By "good," I mean reference that closely matches what I’m animating. Trying to make up animation without a clear picture in your mind of what’s happening in a scene can be really frustrating.

Normal Walkcycle Planning Sketc

Blocking Pass

I focused on the outward swinging of the arms and the hip rotation, as these are elements that can distinguish a female walk from a male walk. Some areas I needed to work on were creating more “organic” hand poses, reducing the back-and-forward translation of the torso in the side view, and keeping an eye on the usual knee pops.

Spline Pass

Overall, I was happy with how the walk turned out. Don’t get me wrong—it could definitely use more polish, particularly with the hand poses and the overlapping action of the ponytails. I probably should have given her just one ponytail at the back of her head to make it simpler to animate.

That reminds me of the old abbreviation from Richard Williams’ book, K.I.S.S., which stands for “Keep It Simple, Stupid.” What an important lesson for every animation student to remember.

Final Animation

Cartooning with Mike Kunkel Week 7 -8

This was a really fun exercise to do. I’ve read lots of comics, and it’s how I learned to draw as a kid by copying artwork from some of my favorite artists, like Jim Lee and Rob Liefeld. However, I’ve never actually sat down and tried to draw a comic before. These were just a few panels, though, and Mike gave us the script and character designs, so I know creating an entire comic would be exponentially harder than this. I must say, though, the features of Clip Studio Paint made it a lot easier to complete once I roughed out the sketches. Making the dialogue bubbles was so easy, and once I figured out the paneling feature, it was smooth sailing from there.

Roughed Panels

Final Panels

Body Mechanics - Exercise 1 Side Step

Back in the summer, I started the 3D character animation program at Animation Mentor. Now, I want to start documenting my progress through the program in a more step-by-step way rather than just showing my end-of-course reels. Having already taken the first course, Animation Basics, I will start blogging with the second course, Body Mechanics. I am already a few months into the program, so most of the stuff I will be writing about the exercises will be based on what I can remember, but hopefully, I can articulate what I was thinking in my workflow.

Below are the planning sketches I drew up. Basically, it's a simple side step while also trying to include some arcs and overlapping action with the arms and head.

Side Step Sketch Planning

Here is my reference video. After shooting this in my backyard, I realized that I didn’t really do anything with the upper body, so I’m not getting very good reference for that. This will show in my blocking pass because I’m basically making things up. That’s not good! I should have re-shot my reference video.

Blocking Stage

As you can see in the videos below, I had to animate the head and arms without any usable data from the reference video. For the most part, I think I was able to manually pose the work, but my mentor, Keith Sintay, really emphasized the importance of getting the weight and balance correct, so the video data would have been helpful for that.

Blocking Front View

Blocking Side View

Spline Stage

My first pass at splining didn’t go as well as I had hoped. I felt the overall movement was slow, so I sped up the animation a little too much, and it lost some of its weight. Also, the ending, where he wiggles from the waist, is very bad. I learned a very important lesson here: make the video reference look as close to the final animation as possible. The more data you can pull from it, the better.

Spline Front View

Spline Side View

Tiedown Stage

In this stage, I went back to the original timing and adjusted the settle at the end to focus more on the top of the body with the head. The right leg still feels a bit floaty on the plant to me. The balance in the side view could also use an extra pass.

Cartooning with Mike Kunkel Week 5 - 6

The subject for Weeks 5 and 6 in Mike’s class was comic strips. This was something I was really excited to learn more about. Growing up, I always picked out the Sunday comics from the newspaper to read all the strips with artwork I loved. Garfield, Peanuts, and Family Circus were a few of my favorites. For the assignment, we had the option to use a provided script or create our own. I chose the latter since I've had an alligator character living in my brain for the past 40 years. One of the few core memories I have left as a child was seeing a sketch of an alligator in my mom’s sketchbook when she was studying fashion. For some reason, it stuck with me and I think it was the impetus for me to even start drawing at an early age.

First Rough

Revised rough after getting feeback.

Final

Cartooning with Mike Kunkel Week 4

Sorry I’m late in posting this! The week 4 assignment was to illustrate a greeting card, and it turned out to be such a fun exercise. I’ve bought so many greeting cards based on the cover art, but I never once thought it could be a career option. I also did a final pass on my one-panel cartoon using traditional pen and ink. I had been practicing with pen and ink for a few weeks before the assignment, so it was nice to finally use it for this!

Back from Lightbox Expo!

Last week, I attended my first Lightbox Expo in Pasadena. It was a looong drive from SF, especially with a 4-year-old in the backseat asking every 10 minutes, “Are we there yet?”—but it was well worth it. The event is held annually for industry professionals and fans of animation and illustration. I attended some fascinating panels and demos and met a few industry recruiters who offered helpful portfolio advice. I also bought a lot of amazing art books from familiar artists and discovered some new ones. I even got to meet the legendary Chris Sanders!

Animation Mentor AN01 Course Reel - Animation Basics

In the summer, I started the 3D Character Animation program at Animation Mentor. My first class, Animation Basics, was taught by Robyne Powell. I thought she was a fantastic teacher and offered invaluable insights about animation and the industry in general. For me, it was also a great experience just getting back into character animation. I hadn’t touched a 3D animation program in over a decade, so it felt like a tall mountain to climb at first. But as the class progressed and I re-learned Maya, it slowly felt more like a steep hill.

Cartooning with Mike Kunkel Week 3

This week’s objective was to sketch a gag panel cartoon based on some ideas. It was a really fun exercise that brought back many childhood memories of reading cartoons in the Sunday newspaper, especially The Far Side. I remember going to the library, borrowing Gary Larson’s books, and trying not to laugh too loudly. I chose the idea about an elephant who loves pizza and sketched several panels, exploring different camera angles and character designs. I ended up liking the one with the mother and child staring at him—it’s probably the one I can relate to the most, haha!

Cartooning with Mike Kunkel Week 2

I’m really enjoying learning from Mike Kunkel. Every time he goes over my drawings, my mind is blown. He see things that makes my drawings a hundred times better. For week 2, we were tasked with scribble sketch 3 individual stories given a few parameters. I had so much fun with this assignment and tried to let my mind go free and literally put pencil to paper. The foundation shape exercise was super tough, but it really pushed my creative brain!

Cartooning with Mike Kunkel

In addition to enrolling in Animation Mentor, I started taking a cartooning course with Mike Kunkel at the Cartoonist Academy. Mike Kunkel is a talented artist who has worked on numerous animated projects for television and feature films. He also has his own children’s book series, Herobear and the Kid. I’m really looking forward to learning from him this fall and improving my cartooning skills. My first assignment was to sketch a cat holding a cake and a balloon using different drawing tools.